Let me start by saying this post was a long time in the making. A LONG time. I completed this project in October, but since it was a gift, I didn't want to post it before I gifted it! And today is finally the day! I'm meeting my old co-worker for lunch and will give her adorable 2-yr-old daughter these cute skirts.
So here we go. My inspiration - a little toddler skirt from Pinterest.
I saw some printed courderoy at JoAnns, and knew it'd be perfect - wintery warm but still colorful! I looked at some different sizes online, and decided to go with 40" width, 13" length. This would give me a seam allowance and room for gathering at the top.
I started by hemming the bottom - half an inch, folded twice, so that all loose edges were hidden. And bright green thread, of course. (Side note - that bright green thread is all gone now. In roughly two months, I used the whole spool. Sewing too many green things, I think... you'll see some of them soon).
And then sew along the seam you just made. This part is actually interesting. You want to sew on the back (inside), so you can see where your hem is, but your back thread will end up showing on the front. So get your tension right so your thread looks good.
I ended up using the standard stitch, but thicker - it repeats each stitch twice for a heavier line.
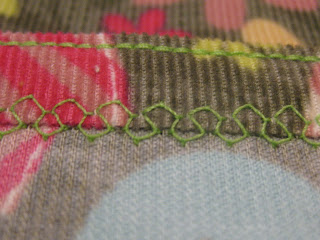
Then, to make things prettier and really "seal" my back hem, I sewed along the bottom with a decorative stitch.
I sewed on the "front" of my skirt, but lined it up right so that it overlapped my fold in the back, like below:
Since I wanted all of my edges to be very clean and sturdy, I then did the double-fold hem on the right and left sides of my skirt (which is still in rectangle form), and topstitched two lines down for security.
I also sewed down the top of the skirt with just one half-inch fold (you'll sew it over again for the elastic waistband, so doesn't matter if the raw edge is shown).
At this point, I brought it to my ironing board to iron down my seams.
Here's where I sewed my left and right ends together, inside out, to make my back seam. This turned my rectangle into a loop!
By ironing down the seams, you reduce bulk. If you want, you can also sew down these flaps you just ironed, for more security. I didn't do that with this skirt, but I did with another.
Your ends will also be fairly bulky - I ended up cutting off the bulk at an angle.
Slightly less cumbersome now.
The last step is the waistband. Take your skirt top and fold it down, about a half inch wider than your elastic. I believe I used a 1-inch elastic, so my fold is roughly 1.5". Pin all the way around.Starting about an inch to the right of your back seam (about an inch to the right of the seam in the photo above), start sewing down your waistband loop. I followed my earlier hem line to be accurate.
Go all the way around the skirt, but stop about an inch before your hem line. This should leave about a two-inch gap in the back. My pins below show the non-sewn part.
Cut your elastic to the right length - I think I aimed for an 18" waist, unstretched, and then added another inch for seam allowance, for a total of 19". Attach a safety pin to both ends of your elastic. Feed one end through the gap you left in your skirt, pushing the safety pin to the left and your fabric to the right. Your elastic will travel through the skirt and start to gather the top. Once the end of your elastic (the part you aren't feeding) gets close to the waistband hole, pin it in place while keeping the rest of your elastic travelling through. This prevents your elastic end from getting lost in the waistband.
Once you feed it all the way through, your elastic will meet at your back seam. Overlap them about a half an inch (hence your extra inch when cutting).
Sew down this overlap with several lines - keep it secure!
Then push the elastic loop back into the waistband, and sew down the hole you left in your loop. And your skirt is complete! (Forgive the bad/varying lighting.)
Since your original width (40") was way bigger than your elastic (18"), the top gathers nicely .
I paired this skirt with an adorable cardigan I found at Old Navy.
Super easy skirt. I also made another one for little Mayra with brown and bold colors, with a ric rac hem at the bottom. I'll try to find some photos of that one. Since then, I've also made several smaller skirts, in 6 mos, 9 mos, and 12 mos sizes - some in flannel. Super cute, and fairly easy! I'll share those soon enough.
In other news, today is the Feast of St. Lucia! Happy Feastday and half-birthday to me!


No comments:
Post a Comment