Monday, October 31, 2011

the goose loves halloweenie


 Happy Halloweenie!!

This is a very special post. I want you all to know that today is STILL Halloween, which means that this post is perfectly ON TIME! I'm not writing this two weeks later and pretending I'm on time!

These photos are so fresh that the mac n cheese is still warm. But let's not get ahead of ourselves.
 
Okay this picture is actually like three days old. Our dear friend Jackie came over on Thursday night to celebrate pre-Halloween, since she works tonight (as an ER nurse - wowza). Here she is decorating her punkin like a piggy!
 It even comes with a tail! It's like pumpkin-meets-potato-head.
 Then on Saturday night, our good friends (and sisters!) Carolyn and Stephanie came over on their way to go partay-ing to show off their cute costumes. Carolyn is Dorothy and Stephanie is Eeyore, if you are having trouble there. P.S. Stephanie scared the sh** out of Bentley - something about the big furry ears and paws and stuff made him howl for a good 10 minutes straight. It was AWESOME. I'm having trouble uploading the video to the blog, otherwise you'd all be enjoying that spectacle.
 Okay so now we're caught up. Here's Jackie again, with her sweet puppy-bee Dakota. They look like they're in costume, huh! Well Jackie's actually just going to work. As a nurse. Haha. Kody is with us for the night, having a sleepover with Bentley.
 So after Jackie dropped Dakota off, Billy and I got to work on our delish dinner. We hid from the trick or treaters - we're too cheap and lazy to pass out candy. Our front door is really far from our kitchen/living room, and we'd have to cross the dog gate and keep two dogs from bolting out the door or howling at the poor little princesses and pirates, so we decided to skip it.

We celebrated the holiday with food, instead! Yep, Lucy's Famous Mac n Cheese.

Not necessarily famous in a good way, though, if you ask Carolyn. She's had one of the failure batches. But tonight's was a real winner. I'll share the top secret recipe with you, my friends.

Chop half an onion and a few cloves of garlic, and saute it all in butter. Or Smart Balance, if you want to be healthy. We do.
 Once your garlic and onion is toasty brown and fragrant, whisk in about 2 tbsp of flour. You want to make sure you still have a little butter or oil or smart balance liquid in there - a dry pan with the onions won't do. You're making a roux here. Sounds fancy and french, but it's really no biggie.
 While you're vigorously stirring your flour mixture, measure two cups of milk (you can throw in some half and half or heavy cream if you happen to have some on hand. defeats the purpose of being healthy with the smart balance, though...) and throw it in the microwave for about a minute.
 Once your flour and onion mixture is nice and mixed up - not chalky/powdery, but a little bubbly and thick, start slowly pouring in your two cups of milk. And when I mean slow, I mean pour a quarter cup at a time, and whisk vigorously for a minute or two in between each pour. Using the whole glass will take a good 5-8 minutes. You don't want to get all the liquid in there too fast, or your flour will clump. Having the milk a little warm (hence the microwave minute) also helps it gel well with the flour.
 You should notice your flour-y mixture slowly getting creamy, like sauce. This is a bechemel sauce, technically speaking. Not sure I spelled that right, though.

So to celebrate Halloween in our own way, I thought we'd go extreme with the orange. I started with adding some yellow food-coloring gel to the sauce.
 Side note - yummy cheddar cheese, to be added later.
 Then I added red, to get a nice deep orange. There's the spirit!
 Once your sauce is good and bubbly, pull it off the heat and stir in your cheese - about three cups. We usually use a combo of mozzarella and parmesan, because that's what we usually have around, but we went with the holiday spirit and got a small block of medium cheddar, shredded by Mrs. Cuisinart.
 Once your cheese is pretty melty, fold in your pasta. We had pre-cooked mini wheels.
 Ughmmm. I could eat this stuff as is.
 But no, here's an opportunity to practice self control. Pour your cheesy pasta into a baking dish of any shape or size, and then sprinkle generously with parmesan (or other) cheese and breadcrumbs. Bake for about 20 minutes at 375, then broil for 5 minutes at about 400 (or high).
 Meanwhile, take photos of the pumpkin that you decorated earlier that evening.
 I was going for my own take on this Pinterest pumpkin, but not entirely sure I succeeded. I wanted to use bigger dots, but now you can't see the swirly effect as clearly.
 That's okay - it kinda reminds me of spiders, which is equally halloweenie.
 After you finish taking photos of your pumpkin and finish cleaning your kitchen, your glorious mac n cheese is complete. So take some photos of it.

Close ups are important.
 Mmmm, cheesy-bread-crummy-crispy-top.
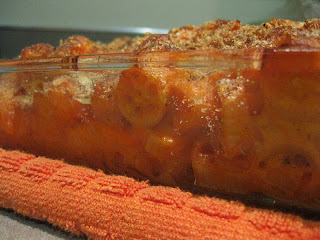
 Bubbly mac-n-cheese goodness on the sides.
 Like how that mounds? I do.

 And then serve, but don't give to your husband until you get a few more shots. That's okay, he can wait. He's still cleaning up the kitchen anyway.
 Yay for cheesy-orange wheels. This stuff actually reminds me of the Kraft stuff, but with real cheese...
So Happy Halloween, y'all. Hooray for catching up in posts! See you soon.

Saturday, October 29, 2011

the goose loves pumpkin spice bread

 We're on a roll! And it's full on fall-ish-pumpkin season. Did you catch up on the carrot cake cupcakes and the pumpkin coffee cake? Well this recipe came about by pure convenience.

Pumpkin? Check. I had some leftover from the pumpkin coffee cake.
Cake mix? Check. I have a box of Betty Crocker Super Moist Spice.

And that's really it, in terms of ingredients. But I couldn't just go with two ingredients. Not when I could add extra tasty things, like eggs and spices. Mmm.
 So I don't really need to get specific with the directions here, except to describe that you mix everything together. I started with the wet - 2 beaten eggs and pumpkin. Then I added the classic fall collection of flavors - cinnamon, nutmeg, and cloves. A pre-mixed "pumpkin pie" spice would do too.
 Then you mix in the cake batter. You could also use yellow, or white, or even chocolate...
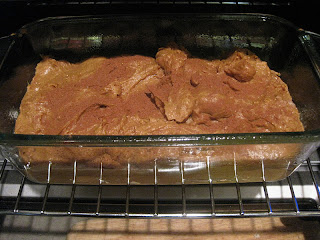
 I piled it all in a laof pan and topped it off with more cinnamon. Yes, I love cinnamon.
 And the result? Glorious, super easy, delicious, pumpkin bread. (Bake for about 40 min at 375.)
 But you can't eat pumpkin bread plain, huh. No way. That's why you drizzle maple-cream-cheese frosting, which you have leftover from when you made it for your second batch of carrot cake cupcakes. Oh and top with more cinnamon. Can you ever have enough? Is chocolate ever gross?

So after you make that pumpkin coffee cake, I must recommend you make this pumpkin bread with your leftover pumpkin. So worth it.

Tuesday, October 25, 2011

the goose loves pumpkin coffee cake

 So if you can't tell, we're officially giving up on summer (what summer? yeah. there wasn't any.) and moving full-on into fall. I'm doing my best to embrace the cold days that let me wear my peacoat and bake with pumpkin. This pumpkin adventure really hit the spot on the weekend - it was easy to pull together but so. amazingly. delicious. No joke here. This is SO worth it.

This recipe was really meant to be. It was Saturday morning, and I was hunting online for a tasty treat. I looked up one of my fave food blogs, How Sweet It Is, and bam - there it was. Pumpkin Coffee Cake. Oh yeah. With brown sugar glaze. We didn't even make the glaze, but wow this was tasty.

The recipe was on Tasty Kitchen, but I'm sharing it for you here, with all credits to Jessica at How Sweet Eats, Heather, and Tasty Kitchen.

Pumpkin Coffee Cake with Brown Sugar Glaze

Ingredients

  • ⅓ cups Water
  • 1 can Pureed Pumpkin (15 Oz)
  • 2 whole Eggs
  • 1 Tablespoon Vanilla Extract
  • 2 teaspoons Pumpkin Pie Spice
  • 1 box Yellow Cake Mix (18 Ounce Box)
  • 1 teaspoon Baking Soda
  • 1 cup Brown Sugar, Divided
  • ½ cups Flour
  • ⅓ cups Walnuts, Chopped
  • 4 Tablespoons Butter, Melted
  • ¼ cups Granulated Sugar
  • 1 teaspoon Vanilla Extract
  • ¼ cups Heavy Whipping Cream

Preparation Instructions

Preheat the oven to 350F.

1. In a large bowl mix together the water, pumpkin, eggs, 1 Tablespoon of vanilla, and pumpkin pie spice until well combined. Add the cake mix and baking soda and mix until just combined.
2. Grease a 9×13 pan with butter and pour batter into pan.
3. In a small bowl mix together 1/2 cup of brown sugar, 1/2 cup flour, walnuts, and melted butter. Use fingers to sprinkle over the top of the cake. Bake at 350 for 25-30 minutes, or until a toothpick inserted comes out clean.
4. For the glaze, combine the other 1/2 cup brown sugar, granulated sugar, 1 teaspoon vanilla, and heavy cream in a saucepan and bring to a simmer. Remove from heat and stir until all sugar is dissolved.
5. When cake is finished baking, poke holes in the top with a toothpick. Pour glaze over the cake, making sure to cover all surfaces. Serve cake warm or at room temperature.


Mix wet ingredients.
Add in dry ingredients.
This recipe is made super easy by using a box cake mix. And yeah, having the butter recipe yellow cake mix didn't hurt one bit.
 We used a 9 x 13 pan to get the classic coffee cake effect. However, this would be equally wonderful in a bundt pan or even in round cake pans. Yum.
 Here's the best part of this dish - the brown sugar topping.

Ready for the oven!

 And wonderfully hot out of the oven. (Sorry about the funky white balance.)

Let's zoom in on that brown sugar goodness.
 So the recipe suggests a brown sugar glaze, which I don't doubt would be a-mazing. But that's a lot of sweetness. And it's only breakfast. Oh and we already have leftover cream cheese frosting from my carrot cake cupcakes. So I stick a bit in the microwave to get it glaze-y and drizzle it thickly on top.

 Haha this picture looks funny. Green half-moon for breakfast, anyone? I made a pesto-feta fritatta as a protein-filled side for our breakfast dessert. Which Billy LOVED.
 Overall, this coffee cake was meant to be. I enjoyed it the next week for some delicious breakfasts. It's so easy, and the results will wow anyone who eats it. So go make it.

Lastly, let me leave you a photo of our little angel. Isn't he so adorable? If only he always was like this.

Saturday, October 22, 2011

the goose loves beer-butt chicken

This one is a nice fast post. Short and sweet. And tasty.

Billy and I have been wanting to make a beer can chicken for awhile. Like years. So we wait until summer is practically over already and decide to grill one up. It was so surprisingly easy and amazingly tasty - we should have been grilling these ages ago.

There are a ton of recipes online, but we decided to use one that Billy's boss Bill gave us:

Rick Browne's Original Beer-Butt Chicken
For the dry rub:
1teaspoon brown sugar
1teaspoon garlic powder 1 teaspoon onion powder
1teaspoon summer savory
¼teaspoon cayenne pepper
1teaspoon paprika
1teaspoon dry yellow mustard
tablespoon fine sea salt

For the basting spray:
1(12-ounce) can of your favorite
beer
1cup apple cider
2tablespoons olive oil
tablespoons balsamic vinegar

For the chicken:
1large chicken

Make the rub: In a small bowl, mix the rub ingredients until well combined. Wash, dry, and season the chicken generously inside and out with the rub. Work the mixture well into the skin and under the skin wherever possible. Place in a medium howl, cover, and set aside at room temperature for 20 to 30 minutes.
Prepare the spray: Pour one cup of the beer into a spray bottle, add the cider, olive oil and balsamic vinegar to the bottle, and set aside.
Heat a grill to 300° to 350°. Slide the chicken tail-side down over the partially-full can of beer; use the two legs and the can for a tripod to hold the chicken upright. Grill for 1-½ to 2 hours over indirect heat. During the cooking time, spray the chicken with the basting spray several times. The chicken is done when the internal temperature reaches 180°.

Carefully remove the bird from the grill, still resting on the can, and place it on a heatproof countertop. After your guests have reacted appropriately, remove the chicken from the beer can with tongs while holding the grill rack with an oven mitt. (Careful! The can is hot.)Give the chicken one more spritz of the basting spray, then carve and serve.
The dry rub.
Here's Billy, pretending to kiss the bacteria-filled uncooked chicken. And washing the chicken too. There's Bentley in the background, making sure his chicken doesn't go too far.

Wave hello!
Bentley keeping watch over his chicken. No, our beagle isn't as tall as the counter. He just stands on the back of the couch, which sits up against our bar.

That chicken's for me, right Dad?
I've never seen him so focused. Oh wait, unless he's looking at a treat in your hand. Or unless he's looking at the carrot cake cupcake-muffin in my hand. Okay he gets really focused on food, whether it's for him or not.
Ah, now yu can see his set up. I can't believe he broke his gaze with Mr. Chicken. I guess Bentley loses that staring contest.
Here's our glorious dry rubbed chicken.
Now don't let this photo fool you. We enjoy ourselves a good drink, whether it be beer or wine or something harder. And no, we did not substitute Sprite for beer in this recipe. It's just that my husband is a rather (terrific) beer snob, and doesn't buy beer in cans. So we poured the Sprite into a glass (and then I poured some raspberry vodka into that same glass - see? we drink) and then filled the empty can with beer.
See the foamies? It's beer. Billy made sure we took this shot to prove to people it was beer. :)
Remember this grill?
There's the cute little chicken, standing up on its duck feet.
Hahaha this picture cracks me up. Done chicken, just chillin in the microwave (keeping warm).
Looks like a fat person without a head.
Finally, the glorious result!!

Tasty, crispy, juicy chicken. I wish I still had some of you.
You were so tasty in the chicken noodle soup we made later from boiling your bones.
So if you are like we were, and haven't ever made one of these, I recommend it right away. Ready, go!