Thursday, March 31, 2011

the goose loves geese!!

Just a short post today, but a good one!


A couple of weeks ago, I made a goose with a pattern I found online.

Rather easy, once you get the hang of it!

Just don't forget to sew the feet and wings on, like I did...

I had to cut open some holes to fit them back in.


What's good about a goose if it can't fly? :)

Now to find somebody to love it...

Tuesday, March 29, 2011

the goose loves corned beef hash

Okay I lied. THIS is my last post related to St. Paddy's. Really! So on Saturday morning (the day after our party), Billy and I woke up, did 3 counter-fulls of dishes, and then looked at our leftovers from the night before. We had a decent-sized tupperware full of our cooked cabbage-carrot-potato-onion mixture, and a slab of corned beef. So what to eat for breakfast? We could have St. Patrick's Day Feast #2... or... corned beef hash! The hash sounded way more appetizing that morning. So I chopped our cooked fingerlings, sliced our corned beef, and mixed the veggies and meat with two scrambled eggs. I topped it off with a little cheese, of course!
And what better to go alongside our hash than black coffee and toasted soda bread? :)
Here's a close-up of our picturesque hash...
And the even-more-picturesque and tasty-looking soda bread.
Yum - I'd eat that again!

Monday, March 28, 2011

the goose loves green cookies

So this is my last St. Paddy's Party-related post until next year (I think!). And such a fun one! I LOVE making cutout cookies, and have quite a collection of cookie cutters to show for it. I haevn't made them in awhile, and figured that it'd be a great day to use my shamrock shape, and while we're at it, why not make them green? I also imagined frosting and decorating them, but we didn't quite get that far...
Creaming the butter & sugar!
Looks like dough...
And a close up... I forgot to add the green food coloring until kinda late.
And then my dirty dishes.
Green cookie dough - going in the fridge to chill!
And yumm... shamrocks! Here's Shane grabbing a few to munch on...
And one poor shamrock with a bite out of it!
They were a hit - if only they lasted longer.

the goose hates fondant

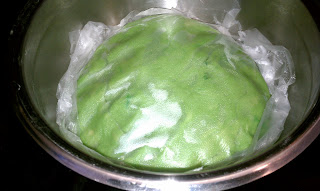
So by now, you might have already read my St. Paddy's Party Post, which explained that we celebrated Allison's Birthday and St. Patrick's Feast Day all at once. And what better way to celebrate than with a cake? And what is more fun than trying something new, like making fondant? Well, not making fondant, for one. But alas, with optimism, hope, and energy, I decided to tackle the challenge of making fondant in order to make my cake look so very pretty. I found a recipe on allrecipes.com for Marshmallow Fondant. I took the advice of one reviewer and used marshmallow creme instead of melting real marshmallows. My downfall? Perhaps. I dutifully mixed together the right things... Added TONS of powdered sugar... too much? maybe? Added vanilla for great taste... And started kneading it into smooth fondant perfection.
But perfect it was not. Not even close.
I kept adding more powdered sugar to keep it from sticking to EVERYTHING.

It was suppposed to be getting smoother, but not for me...

Eventually I decided it was smooth enough, so I rolled it into the recommended log shape and gave up for the night, saying a prayer it would work the next day.
Meanwhile, Friday comes and so I bake 3 layers of delicious chocolate cake.
Now, in between the photo above and below, you would think magic occurred. But no, there was no magic. Only swearing and messes and a sight too ugly to photograph. Plus, both Billy and I were covered in sticky-powdered-sugar-non-fondant-like-goop so neither of us were clean and sane enough to photograph the mess. But it wasn't pretty for awhile - the fondant wouldn't roll out without sticking, and then when we tried to put it on the cake, it was just MESSY. And ugly.


But then we patched the sides and covered the holes and added some green frosting decoration to cover the bad parts, which is how we get to the more-beautiful photo below.
A complete St. Paddy's/Birthday cake, with a fun shamrock topper and (fake) gold coins on the sides.

And the most important part? It was tasty. Very tasty. Very sweet, but tasty.
But is there more fondant in my future? Probably not.... no, definately not!

Sunday, March 27, 2011

the goose loves broccoli and cheese

So here's a post, in the vein of catching up, that complements my earlier "St Paddy's Party" post! To boost the color and health-full-ness of our St. Patrick's Day feast, I decided to make broccoli cheese soup from a recipe I found in Cooks Illustrated. The test kitchen loved the combo between broccoli and cheddar, but found that too many soups mask any broccoli flavor (and health benefits) with too much cheese, and that the color never quite screams "broccoli." So they went about perfecting a new recipe for a delicious soup, and they did a great job! Seems like a lot of ingredients, but overall not difficult to make. Just a little time consuming. But I had all day, so no problem! I started by roughly chopping 3 "heads" of broccoli - florets, stems, and all. I put them in my Le Creuset with a little water and salt, and let them simmer down.


I then added chicken broth, allowing it to simmer a bit longer.


Now here's the secret ingredient - to boost color, flavor, and health-factor, you add about two cups of fresh spinach, and allow it to wilt for a minute or two in the hot broth-broccoli mix.

Then comes the good part - cheese! I measured out cheddar and parmesan -about 5 oz combined.


To make the right consistency, you blend the soup, in batches, in your blender or cuisinart. I added a handful of cheese to each batch of soup in the cuisinart, blending until smooth.


I ended up making the soup earlier in the day, since I knew I'd be busy with several other things later, so once blended, I just put the soup in a big mixing bowl and covered it for later. Then, about 20 minutes before serving, I poured the soup back into a pot and reheated - easy!


Here it is, ready to be devoured! The recipe made just enough for a relatively hearty "first course" for 6 hungry people... and it really was delish! Served with just a pinch of parmesan on top!

Saturday, March 26, 2011

the goose loves st. patrick

So here is my OFFICIAL St. Patrick's Day Party Post.

Two Thursdays ago (March 17) was St. Patrick's Day. Two Fridays ago (March 18) was the birthday of two great friends of mine, as displayed on my calendar below!


Happy Birthday, Rachel & Allison!

Rachel was home in San Diego, celebrating, and I celebrated with her in spirit. Allison was in Portland, so we threw her a little party, celebrating St. Patrick's Day at the same time. She's rather Irish also, so it was a fitting combination.

Several posts will follow that detail several items from the menu, but for now, I'll share some general memories of the day.

Here's Billy, "angrily" carving the corned beef. And what's St. Paddy's without Guinness? And we have the most appropriate glasses for it... :) Here's a photo of the table set up, with the deliciously green broccoli cheese soup leading the way. We also enjoyed corned beef and cabbage (duh), homemade Irish soda bread, and potatoes. For dessert, we had chocolate cake and cut-out shamrock sugar cookies! Bt the end of the evening, Bents was pretty sleepy from all the hard work he did.
Hope you had a wonderful time, Allison & friends!


Friday, March 25, 2011

the goose loves swirly skirts

First of all, I'm very behind in blogging - it's been a busy week! So I'm catching up a little, and by next week I hope to have a good long post about our St. Paddy's Fiesta! Or maybe I should say St Paddys Feis....

Anyway, today I want to show you an apron I made for my dear friend! It is from the same packet of patterns that helped me create Monika's apron (see old posts). This one just goes around the waist, and is much more flirty!

So I started by cutting out my patterns, trying to use my cute black and cream fabric as economically as possible.
Snip Snip!

The pattern consists of three half-circle shapes of material, ranging in size. The biggest half-circle forms the bottom, and the second two get smaller and layer on top. Rather than sewing seams on the bottom of each of the layers, the instructions suggest enclosing the raw ends with bias tape. So rather than use boring black or white, I chose this awesome blue.

Here I am sewing the bias tape to the edge - I used the extra-wide double fold stuff, which makes sewing super easy. Time consuming? Yes. But easy!
Then you lay out all three layers on top of each other, and pin in the right place so that the middles and edges align in perfection. Not only does it look pretty,
but it makes a pretty cool picture.
And here's the whole apron - lined up on my messy sewing/diningroom table.

And of course you need a close up of my nice pinning job aroudn the middle...

Then, with a few easy magic stitches on your machine, voila!


I guess I should have taken some pictures of the part where you attach the waistband to the skirt piece, and then attach tie straps to the waistband, but those are more boring.

Here's the side view, with poor lighting, on my rolling-desk-chair-model.

And with better lighting! The best part about this apron is that when you put it on, it makes you want to dance! It's definately more for fun than for usefulness... oh well.
One last close up, again poor lighting, but maybe you can see that along the waistband and tie straps, I used the same bright blue thread as I used along the blue bias tape - in person, it kinda pops out and brings some extra color to the classy fabric.

So my suggestion to future flirty apron wearers (including my friend who got this one) is this:
If you are making a dinner for friends, family, boyfriends, fiances, husbands, or in-laws, wear a useful/sturdy/full front apron for most of the cooking. Then, right before the guest show up, change into this pretty little number and you'll look like you didn't sweat/drip a drop!